
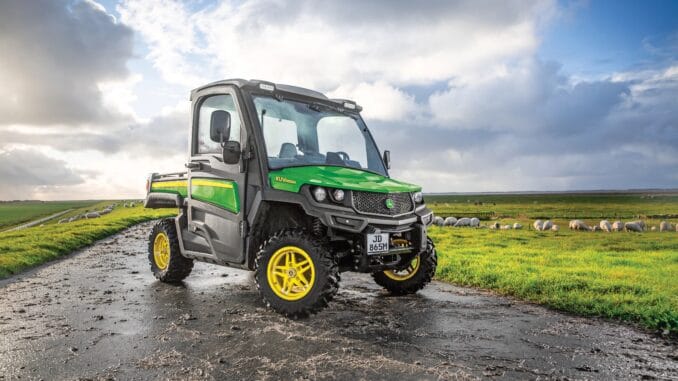
Introduction / Model overview
The John Deere Buck is a mid-size utility ATV / light off-road machine that many acreage and small farm owners use for towing, hauling, and general property work in addition to trail riding. It combines a compact chassis, 4-wheel capability and a utility-focused rear rack and hitch, so it often ends up pulling small trailers, spraying rigs or light implements around the yard and farm.
This guide is written for DIY owners in the USA and Canada who want a plain-English reference to John Deere Buck parts, repair, troubleshooting and maintenance. You will find symptom-based troubleshooting, a clear DIY vs dealer line, a parts list with OEM numbers, and links to diagrams and manuals so you can cross-check every component before ordering or fitting.
General overview of the John Deere Buck
The John Deere Buck sits in Deere’s utility ATV line rather than the lawn tractor or compact tractor families, and it is designed for off‑road use with towing and hauling capacity instead of mowing. Typical Buck models include a liquid‑cooled gasoline engine, CVT (continuously variable transmission) with belt drive, selectable 2WD/4WD, and hydraulic or mechanical brakes. The key systems you will work on are the engine and fuel system, CVT and drivetrain, braking system, suspension and steering, and electrical system (battery, charging and lighting).
Owners most often buy John Deere Buck parts such as air filters, oil filters, spark plugs, CVT drive belts, brake pads, wheel bearings, batteries, light bulbs, and control cables. In heavier use, you will also see front and rear shocks, tie rod ends, and hub components needing replacement. Parts diagrams and manuals are essential for matching these to your exact Buck model and serial number, because some components change between years or sub‑models.
Troubleshooting approach on a John Deere Buck
The fastest way to troubleshoot a John Deere Buck is to start with the symptom you actually see rather than guessing at parts. Think in terms of “will not start,” “starts but runs poorly,” “no drive,” “strange noises,” “poor braking,” or “electrical issues” before you dive into the catalog. Once you have a clear symptom, you can use this guide, the official parts diagrams, and your operator’s manual together to narrow down likely causes.
For the Buck, the main symptom categories are: starting issues, running and power problems, driveline and CVT issues, vibration and noise, braking performance problems, and electrical or safety-switch faults. In many cases, simple checks like confirming fuel quality, battery voltage, and belt condition will either fix the issue or clearly point to a deeper problem that requires dealer attention.
Emergency and immediate repair needs on a John Deere Buck
Some John Deere Buck problems must be dealt with immediately because they affect safe operation or risk damaging major components if you keep riding. If the engine will not start, the drive belt is slipping badly, the brakes are weak or uneven, or the ATV makes loud metallic noises, stop and diagnose before you continue.
Starting issues – John Deere Buck
This typically looks like a Buck that cranks slowly, clicks but will not crank, or cranks normally but never fires. It matters because repeated cranking can drain or damage the battery and starter, and no‑start situations may hide deeper fuel or ignition problems.
Common causes:
-
Weak or undersized battery.
-
Corroded battery terminals and poor grounds.
-
Blown fuses or faulty safety switches (gear, brake, or neutral interlocks).
-
Stale fuel or blocked fuel delivery.
Basic checks an owner can do:
-
Confirm the battery is fully charged and the correct capacity for your Buck.
-
Clean battery terminals and main grounds to bright metal.
-
Check fuses and verify safety switches are being actuated correctly.
-
Drain old fuel if the machine has sat and verify fuel flow to the engine.
Running and power problems – John Deere Buck
Here you will see a Buck that starts but surges, stalls under load, misfires, or lacks power when towing or climbing hills. Ignoring these symptoms can lead to overheating, belt damage, or internal engine wear.
Common causes:
-
Dirty air filter or restricted intake.
-
Fuel contamination or partially blocked fuel system.
-
Worn spark plugs or ignition components.
-
CVT drive belt glazed, worn or contaminated.
Basic checks:
-
Inspect and replace the air filter if dirty or damaged.
-
Check fuel quality and run fresh fuel through the system.
-
Inspect spark plugs and fit correct replacements as needed.
-
Remove the CVT cover and inspect the belt for wear or contamination.
Vibration and noise on a John Deere Buck
This usually appears as new rattles, grinding noises, or heavy vibration through the chassis, often at certain speeds or when engaging drive. It matters because drivetrain, bearing or CVT issues can escalate quickly into major failures.
Common causes:
-
Worn CVT belt or clutch components.
-
Loose engine or drivetrain mounts.
-
Worn wheel bearings or hub components.
-
Loose racks, guards or exhaust.
Basic checks:
-
Inspect the CVT area for loose parts, belt condition and foreign objects.
-
Check engine and driveline mounting bolts for tightness.
-
Lift each wheel and feel for bearing play or roughness.
-
Tighten racks, guards, and exhaust brackets where needed.
Braking problems – John Deere Buck
You may notice long stopping distances, pulling to one side, spongy lever feel, or grinding noises when you brake your Buck. Because braking is safety‑critical, these issues demand immediate attention.
Common causes:
-
Worn brake pads or shoes.
-
Low brake fluid or air in hydraulic lines.
-
Seized or sticking calipers.
-
Damaged brake cables on mechanically‑actuated systems.
Basic checks:
-
Inspect pad thickness and condition at each wheel.
-
Check brake fluid level and look for leaks.
-
Test lever feel and look for uneven braking between wheels.
-
Inspect brake cables and linkages for damage or corrosion.
Electrical problems and safety switches – John Deere Buck
Electrical issues show up as dead lights, intermittent starting, dash warning lights, or accessories that do not work. Safety‑switch faults can prevent starting or cause the engine to cut out unexpectedly.
Common causes:
-
Weak battery or failing charging system.
-
Corroded connectors or damaged wiring.
-
Faulty ignition switch or handlebar controls.
-
Misadjusted or failed safety interlock switches.
Basic checks:
-
Test battery voltage with a meter and confirm charging while running.
-
Inspect wiring harnesses for chafing, corrosion or broken insulation.
-
Check switch operation and replace clearly faulty units.
-
Verify that all safety switches are correctly adjusted and not bypassed.
DIY or dealer? Repair decision guide for the John Deere Buck
On the John Deere Buck, the line between DIY and dealer work usually falls between routine maintenance plus straightforward bolt‑on parts, versus internal engine, transmission or complex electrical diagnostics. If the job involves fluids, filters, belts, pads, and easily accessible components, most competent DIY owners can handle it; if it requires special tools, deep disassembly or factory software, it is better suited to a Deere dealer or experienced powersports technician.
Good DIY jobs – John Deere Buck
-
Engine oil and filter changes.
-
Air filter and spark plug replacement.
-
Battery and main cable replacement.
-
CVT belt inspection and replacement (with proper safety precautions).
-
Brake pad replacement and basic brake bleeding.
-
Light bulbs and simple wiring repairs.
Advanced DIY or dealer jobs – John Deere Buck
-
Internal engine work (top end, valves, pistons).
-
Internal CVT clutch repairs or replacements.
-
Differential and gearcase rebuilds.
-
Deep electrical diagnostics and harness replacement.
-
Frame repairs and steering/suspension geometry setup.
Skill level guide for Buck owners
-
Beginner: Oil changes, air filters, spark plugs, battery swaps, light bulbs.
-
Intermediate: CVT belt replacement, brake pad changes, simple wiring repairs, wheel bearing replacement.
-
Advanced: Internal engine repairs, clutch and gearcase work, full harness diagnostics, structural suspension repairs.
Parts needed, OEM vs aftermarket, and what information you need
Before you order John Deere Buck parts, gather the full model name (Buck, Buck EXT, etc.), the Product Identification Number (PIN), and the year of manufacture. If your Buck has engine or drivetrain variations across years, note the engine model and any special options such as 4WD, differential lock or accessories. This information is essential when you look up parts diagrams to avoid ordering components that only fit other Buck variants.
Here is a typical John Deere Buck parts table for common service items (verify against your exact serial number and diagrams before ordering):
For John Deere Buck belts, brake components, safety switches and CVT parts, OEM parts are strongly recommended because correct fit and material are critical to safe operation and driveline life. For filters, batteries and spark plugs, quality aftermarket parts are generally acceptable as long as you use proper cross‑reference tools and match specifications for size, capacity and heat range.
Where to find parts diagrams and service manuals for the John Deere Buck
You can access John Deere Buck diagrams and manuals through several reliable sources. Start with the official John Deere parts catalog and owner support pages by searching your Buck model at:
-
John Deere parts catalog and owner support:
https://www.deere.com/en-us/parts-owner-support/parts -
John Deere Canada parts and service portal:
https://www.deere.ca/en/parts-and-service/parts/ -
Deere Technical Publications / manuals search:
https://www.deere.com/en/parts-and-service/technical-publications/ -
A Deere‑focused parts site with model‑specific Buck pages (for example, Green Farm Parts “John Deere Parts Diagram” section):
https://greenfarmparts.com/john-deere-parts-diagram/
Use the operator’s manual for safety, routine maintenance and basic adjustments, the technical manual for detailed diagnostic and repair procedures, and the parts catalog for exploded diagrams and part numbers. A Deere‑focused aftermarket site helps cross‑check part numbers and availability and often provides an easier shopping interface than the official catalog.
How to locate model, serial and engine numbers on a John Deere Buck
Model and serial numbers matter because John Deere Buck parts often change across production runs, and many online catalogs filter by PIN range. If you order without confirming these tags, you can easily receive incorrect CVT belts, brake parts or electrical components.
Follow these steps to find identification numbers:
-
Clean the frame and tag areas with a rag so you can read them clearly.
-
Locate the Buck’s PIN plate, typically on the frame near the front or side of the machine or under the seat.
-
Record the full model designation and PIN as printed, including any prefixes or suffixes.
-
Note the engine identification tag, usually on the engine block or cooling shroud.
-
Keep these numbers in your records and use them whenever you search parts diagrams or speak to a dealer.
Buying John Deere Buck parts online and in physical stores
A good buying strategy for John Deere Buck parts is to identify the exact OEM number from a parts diagram first, then compare availability between official Deere channels, strong aftermarket suppliers and local dealers. Use your PIN and model details to filter results so you only see compatible parts.
For online purchases:
-
Use OEM numbers and PIN‑sensitive filters to avoid mismatches.
-
Check that aftermarket listings explicitly state compatibility with your Buck model and year.
At a dealer counter:
-
Bring your Buck’s PIN and a list of the parts you believe you need.
-
Ask the parts staff to confirm supersessions and any mid‑year changes.
At retail stores:
-
Only buy consumables like oil, gear lube, grease, spark plugs and universal batteries when packaging clearly lists John Deere Buck or a direct cross‑reference.
Useful URLs to bookmark:
-
John Deere Parts main page: https://www.deere.com/en-us/parts-owner-support/parts
-
John Deere ATV/utility vehicle owner support (regional menus): from the same site, navigate via Equipment → Utility Vehicles → Parts & Support.
-
A Deere‑focused aftermarket catalog such as Green Farm Parts diagrams: https://greenfarmparts.com/john-deere-parts-diagram/
Step‑by‑step fitting guide for common John Deere Buck parts
Below are high‑impact DIY jobs for Buck owners that improve reliability and safety if done correctly. Always park on level ground, switch the ignition off and disconnect the battery before electrical or CVT work.
1. John Deere Buck engine oil and filter change
This job protects your Buck’s engine against wear and overheating, especially if you use it for towing or work in dusty conditions.
-
Warm the engine briefly, then shut it off to thin the oil.
-
Place a drain pan under the engine, remove the drain plug and let the old oil drain completely.
-
Remove the spin‑on oil filter using a proper filter wrench.
-
Lightly oil the gasket on the new OEM‑spec filter and install it by hand, snug but not overtight.
-
Refit the drain plug with a good washer and refill with the correct grade and quantity of oil.
-
Start the engine, check for leaks, and recheck oil level after a few minutes.
2. John Deere Buck air filter replacement
This job improves starting and running quality and helps prevent dust‑related engine wear.
-
Remove the airbox cover as per the operator’s manual.
-
Take out the old air filter element and inspect it for dirt, damage or oil contamination.
-
Clean the airbox interior with a dry cloth, avoiding water or solvents.
-
Install the correct new air filter element, ensuring the seal sits evenly.
-
Refit the airbox cover securely and test‑run the Buck to confirm smooth response.
3. John Deere Buck spark plug replacement
Fresh spark plugs improve starting, idle quality and torque under load.
-
Allow the engine to cool and remove the seat or covers needed to access the plugs.
-
Pull the plug caps straight off, supporting the wires so they are not damaged.
-
Use the correct plug socket to remove each spark plug and inspect its condition.
-
Gap the new plugs to specification, thread them in by hand, then snug them with the socket.
-
Refit the plug caps firmly and test‑run the Buck to confirm smooth running.
4. John Deere Buck CVT drive belt replacement
Replacing a worn CVT belt improves drive engagement, reduces slip and protects the clutch components.
-
Disconnect the battery and remove the CVT cover according to the manual.
-
Inspect the existing belt for cracking, glazing or heavy wear.
-
Carefully relieve belt tension as instructed and remove the old belt from the pulleys.
-
Fit the new OEM drive belt, making sure it sits correctly in the pulley grooves.
-
Rotate the pulleys by hand to settle the belt and verify correct alignment.
-
Refit the CVT cover, reconnect the battery and test drive in a safe area to confirm proper operation.
Maintenance to prevent John Deere Buck problems reoccurring
Regular maintenance is the easiest way to stop common John Deere Buck failures from coming back. If you keep up with fluids, filters, belt and brake inspections, you reduce the risk of breakdowns during towing or off‑road use.
Focus areas for Buck owners:
-
Starting reliability: Keep the battery charged, terminals clean, and spark plugs fresh.
-
Running quality: Replace air and fuel filters on schedule and use clean fuel.
-
Fire/overheating prevention: Maintain oil and coolant levels, clean the cooling system and engine area.
-
Drive performance: Inspect the CVT belt, pulleys, driveline and wheel bearings regularly.
-
Electrical reliability: Check lights, switches and wiring harnesses for damage or corrosion.
Maintenance schedule and year‑round checklist for the John Deere Buck
Base your Buck maintenance on the official chart in the operator’s manual, then adapt it to your use patterns. Heavy towing, dusty work or frequent trail riding may justify shorter intervals.
Daily / before each use
-
Check fuel level and look for obvious leaks.
-
Inspect tires for correct pressure and damage.
-
Verify brake lever/pedal feel and basic operation.
-
Confirm lights and indicators work correctly.
After 8–10 hours
-
Inspect engine oil level and top up if needed.
-
Check CVT area for unusual noise or dust buildup.
-
Look over racks, hitch and accessories for loose fasteners.
Every 25 hours
-
Change engine oil if operating in severe dust or heavy load conditions.
-
Inspect and clean the air filter; replace if heavily soiled.
-
Check brake pad thickness and look for fluid leaks or cable wear.
Every 50 hours or yearly
-
Replace engine oil and filter following the full procedure.
-
Inspect CVT belt and pulleys in detail and replace if worn.
-
Check wheel bearings, steering joints and suspension components for play.
-
Inspect battery condition and clean terminals.
Every 200 hours (or as recommended)
-
Perform a full drivetrain inspection including gearcases, differentials and driveshafts.
-
Flush and replace brake fluid if applicable.
-
Inspect all chassis fasteners and structural weld areas for fatigue.
Seasonal checklist – John Deere Buck
Pre‑season (spring)
-
Change engine oil and filter if not done at end of last season.
-
Inspect CVT belt, brakes, bearings and tires thoroughly.
-
Test battery and charging system before heavy use.
Mid‑season
-
Recheck air filter and clean or replace as needed.
-
Inspect driveline and suspension components after heavy towing or off‑road work.
-
Verify lighting and electrical accessories for night operation.
End‑of‑season (fall/winter storage)
-
Clean the Buck thoroughly to remove mud, dust and corrosive residues.
-
Change engine oil if contaminated or at end of interval.
-
Treat fuel system with stabilizer and run the engine briefly.
-
Disconnect or maintain the battery with a smart charger and store indoors if possible.
John Deere Buck – repair, upgrade, or replace?
For the John Deere Buck, general rules are to repair routine wear items and minor failures, consider upgrades where better components significantly improve safety or performance, and plan for replacement only when major engine or drivetrain issues make repair uneconomical. Because the Buck is a utility ATV, a well‑maintained machine often delivers long service life, but neglect or severe abuse can push it into the replace category sooner.
Repair if…
-
Problems are limited to filters, belts, pads, plugs, bearings or simple electrical faults.
-
The frame and engine are fundamentally sound with no major damage.
-
Parts are available and can be fitted without extreme labour costs.
Upgrade if…
-
You want improved lighting, better tires or heavier‑duty brake pads for work use.
-
Suspension components are worn and you can install improved replacements.
-
You need accessories such as racks, winches or hitches for specific tasks.
Replace if…
-
The Buck has severe engine or drivetrain damage with repair costs near machine value.
-
The frame is bent or rusted badly enough to affect safety.
-
Parts availability is poor for your particular model and year.
Expanded troubleshooting FAQ – John Deere Buck (30–35 questions)
1. Why will my John Deere Buck not start?
A Buck that will not start usually has a battery, safety‑switch or fuel issue. Begin by confirming that the battery is charged and the terminals are clean and tight. Check that all safety interlocks (gear position, brake, neutral) are correctly set when you press the starter. If the engine cranks but does not fire, drain old fuel, confirm fuel flow and inspect spark plugs for fouling or damage.
2. Why does my John Deere Buck only click when I hit the starter?
A single click from the starter relay often means low battery voltage or corroded connections. Charge the battery fully and test it with a meter to ensure it can hold voltage under load. Clean the battery terminals and both main ground points to bare metal. If voltage is good and you still only get clicking, the starter relay or starter motor may need further testing or replacement.
3. Why does my John Deere Buck crank but never fire?
When your Buck cranks normally but never fires, you likely have no spark, poor fuel delivery, or timing issues. Pull a plug cap, fit a spare plug, and check for a strong blue spark while cranking. If spark is weak or absent, investigate ignition components and fuses. If spark is good, verify that fresh fuel reaches the engine and clean any blocked filters or lines before adjusting deeper settings.
4. Why does my John Deere Buck start and then stall quickly?
Starting and then stalling often points to fuel contamination, idle circuit problems or air leaks. Replace stale fuel and clean the fuel filter and lines. Check the air filter and airbox for correct fit, ensuring no major leaks or blockages. If the problem persists, inspect idle settings and consider professional carburetor or injection cleaning following the technical manual.
5. Why is my John Deere Buck hard to start when cold?
Cold starting difficulties usually involve battery performance, choke/enrichment function and fuel quality. Make sure the battery has adequate cold‑cranking capacity and is in good condition. Confirm that the choke or enrichment system operates correctly and that you are following the recommended starting procedure. Using fresh fuel and the correct oil grade for your climate also improves cold starts.
6. Why does my John Deere Buck lose power under load?
Power loss under load suggests restricted intake, poor fuel supply or CVT belt slip. Inspect and replace a dirty air filter and verify that fuel flows freely from tank to engine. Remove the CVT cover and check the drive belt for glazing or wear, replacing it if necessary. If mechanical checks do not resolve the issue, further engine diagnostics such as compression testing may be required.
7. Why does my John Deere Buck backfire or misfire?
Backfiring or misfiring often results from incorrect fuel mixture, ignition problems or exhaust leaks. Check spark plugs for fouling and replace them with correctly gapped OEM‑spec units. Confirm that the air filter and intake components are in good condition and that there are no major exhaust leaks. Persistent misfires may require dealer diagnostics to check ignition timing or sensor inputs.
8. Why does my John Deere Buck vibrate more than usual?
Extra vibration can come from worn CVT components, loose mounts, or wheel and suspension issues. Inspect the CVT belt and pulleys for damage or debris and replace parts that show heavy wear. Check engine and drivetrain mounts for looseness or broken hardware. Lift each wheel and feel for bearing play, then correct any loose or damaged bearings or suspension joints.
9. Why do I hear grinding noises from my John Deere Buck drivetrain?
Grinding sounds from the drivetrain are a serious warning and may indicate failing bearings, gearbox components or CVT parts. Stop using the machine and inspect the area where the sound originates, starting with hubs and wheel bearings. If the sound is internal to the gearcase or differential, do not continue riding; arrange for dealer inspection to prevent catastrophic failure.
10. Why does my John Deere Buck pull to one side when braking?
Pulling to one side under braking means that one wheel is braking harder than the other. Inspect brake pad wear at each wheel and make sure both sides are similar. Check for sticking calipers, seized pins or damaged brake cables. Bleed hydraulic brakes if applicable and correct any fluid leaks or uneven pad engagement so braking is balanced again.
11. Why are the brakes on my John Deere Buck spongy?
Spongy brakes usually result from air in the hydraulic system, old fluid or flexing hoses. Check the brake fluid level and condition, and top up with the recommended fluid if low. Bleed the system to remove air and inspect hoses and fittings for leaks. If your Buck uses mechanical cables, inspect them for stretch or damage and adjust or replace them accordingly.
12. Why do the brakes on my John Deere Buck make grinding noises?
Grinding noises during braking indicate metal‑to‑metal contact, usually due to worn pads or shoes. Inspect the brake components immediately and replace pads or shoes that are worn beyond limits. Check rotors or drums for scoring and replace or machine them if severely damaged. Continuing to ride with grinding brakes risks expensive damage and unsafe operation.
13. Why will my John Deere Buck not go into gear or move?
If the Buck will not move when you select gear, check the CVT belt and drive system first. Inspect the belt for severe wear or breakage inside the CVT cover. Confirm that the gear selector linkage operates correctly and that the parking brake is fully released. If the engine revs but the wheels do not move with a good belt, deeper transmission or differential issues may be present and need dealer attention.
14. Why does my John Deere Buck creep forward at idle?
Creeping at idle often means the CVT clutch is engaging too early or idle speed is set too high. Verify that the idle speed is within the specification given in your manual. Inspect the CVT clutch for sticking components or contamination that might prevent smooth disengagement. If you are not comfortable working inside the clutch, have a qualified technician service it.
15. Why does my John Deere Buck struggle on hills or with a trailer?
Struggling under load on hills or when towing suggests a combination of power and driveline issues. Make sure the engine is fully serviced with fresh oil, a clean air filter and good spark plugs. Inspect the CVT belt and drivetrain for wear or slippage. Check tire pressures and choose appropriate gear or range for hilly terrain to avoid overloading the system.
16. Why does my John Deere Buck overheat?
Overheating can be caused by low coolant, blocked cooling fins or heavy workload in high ambient temperatures. Check coolant level and look for leaks around hoses and radiator. Clean mud, grass and debris from the radiator, cooling shrouds and engine area. If overheating persists, verify fan operation and consider dealer diagnostics to check the cooling system thoroughly.
17. Why is there a burning smell from my John Deere Buck?
A burning smell often comes from oil or fuel leaks contacting hot surfaces, or from a slipping CVT belt. Inspect the engine and fuel system for leaks and fix any you find before continued use. Check the CVT area for belt slip or overheating and replace a damaged belt. Also confirm that electrical wiring is not melting or rubbing on hot exhaust components.
18. Why do the lights on my John Deere Buck not work?
If the Buck’s lights fail, begin with a fuse and bulb check. Replace blown fuses with correct ratings and inspect headlight and taillight bulbs for filament breakage or damage. Check the wiring connectors at each lamp for corrosion or looseness. If lights still do not work, test the light switch and wiring harness with a meter or seek dealer assistance.
19. Why does my John Deere Buck drain its battery quickly?
Rapid battery drain can indicate parasitic electrical loads, charging system failure, or an aging battery. Test battery voltage at rest and with the engine running to confirm that the charging system is functioning. Inspect accessories and aftermarket wiring for devices that remain powered when the machine is off. If the charging system and wiring check out, the battery itself may need replacement.
20. Why does my John Deere Buck dash show warning lights?
Warning lights on the Buck’s dash are there to alert you to faults such as low oil pressure, overheating or electrical issues. Consult your operator’s manual to interpret the specific light patterns. Check basic items like oil level, coolant and battery voltage immediately. If a warning persists after obvious fixes, have the machine diagnosed using the appropriate service procedures.
21. How often should I change the oil on my John Deere Buck?
Follow the interval in your operator’s manual, which typically recommends oil changes every 50 hours or once a season for moderate use. If you operate in dusty conditions, tow heavy loads or run at high speeds frequently, shorten this interval to protect the engine. Always use the oil grade and specification listed for your Buck model.
22. How often should I replace the CVT belt on my John Deere Buck?
The CVT belt should be inspected at regular intervals and replaced when it shows cracking, glazing, width loss or other signs of wear. There is no single hour number that fits every owner because belt life depends heavily on load, terrain and riding style. As a general rule, inspect the belt at least yearly, and replace it proactively if you notice any drive slippage or visible damage.
23. How often should I service the brakes on my John Deere Buck?
Brake service intervals depend on your usage and terrain, but you should visually inspect pads, discs and fluid levels during every major service. Replace pads when they approach minimum thickness and bleed the system whenever the lever feels spongy or you have changed components. In heavy work or hilly environments, more frequent brake inspections are wise.
24. Which John Deere Buck parts should always be OEM?
Safety‑critical and fit‑sensitive Buck parts should be OEM, including CVT drive belts, brake components, steering and suspension parts, and key electrical switches. OEM parts are designed and tested for the Buck’s specific loads and dimensions. Filters, spark plugs and batteries can often be aftermarket if they are high quality and properly cross‑referenced.
25. How do I know which John Deere Buck I have?
The easiest way to identify your Buck is to read the model and PIN tags on the frame and record them exactly. Check the operator’s manual for the model designation and compare it with the tags. Some Buck variants have additional labels or decals indicating special features like EXT or 4WD. Keep these details in your records to avoid parts ordering mistakes.
26. Where can I find John Deere Buck parts diagrams online?
You can search for Buck diagrams in the official John Deere parts catalog by entering your model and PIN, then navigating to the appropriate sections. Deere’s Technical Publications site provides manual listings, while Deere‑focused aftermarket sites offer illustrated parts breakdowns and cross‑reference tools. Use multiple sources together to confirm part placement and numbers before ordering.
27. How do I know a John Deere Buck aftermarket part will fit?
To confirm aftermarket fit, compare the OEM number from the parts diagram with the cross‑reference number listed by the aftermarket supplier. Check that the listing clearly mentions the John Deere Buck model and your serial range. If in doubt, contact the supplier or your Deere dealer with your PIN to double‑check compatibility.
28. What tools do I need for basic John Deere Buck maintenance?
Basic Buck maintenance requires standard hand tools such as metric sockets and wrenches, screwdrivers, pliers and a torque wrench. An oil filter wrench, spark plug socket and a reliable jack or stand are also helpful. For electrical work, a multimeter is essential, and for CVT belt service you may need specific pullers or tools as described in the technical manual.
29. How can I keep my John Deere Buck reliable for farm work?
Reliability comes from consistent maintenance and sensible operation. Stick to the recommended service schedule for oil, filters, belt and brake checks. Avoid overloading or overheating the Buck by staying within published towing and weight limits. Keep the machine clean, store it under cover, and deal with odd noises or warning lights promptly instead of ignoring them.
30. What should I check before riding my John Deere Buck each day?
Before each ride, check fuel level, tire pressures, and look for leaks around the engine and fuel system. Test brakes, lights and steering for normal feel and response. Make sure racks and accessories are securely mounted and that the CVT area shows no unusual noises or smells during a short test run.
31. How do I prepare my John Deere Buck for long‑term storage?
For long‑term storage, clean the Buck thoroughly and change the oil if it is near the end of its interval. Treat fuel with stabilizer and run the engine briefly to circulate it. Disconnect the battery or use a smart maintainer and store the machine in a dry, covered area. Cover the exhaust opening to discourage moisture and pests, and support the machine to reduce tire flat‑spotting if stored for many months.
32. How do I get my John Deere Buck ready after storage?
After storage, inspect fuel, oil and coolant levels and replace any fluid that looks contaminated. Check the battery and charge it fully before attempting to start. Inspect belts, tires and brakes for cracking or stiffness and correct any issues before riding. Perform a gentle test run and listen for unusual noises as the Buck returns to service.
33. When should I take my John Deere Buck to a dealer?
Take your Buck to a dealer when the problem involves internal engine or drivetrain work, complex electronics or repeated failures that simple maintenance does not cure. If you see major leaks, hear heavy grinding or knocking noises, or experience warning lights that you cannot clear after basic checks, professional diagnostics are recommended. Dealers also handle factory updates and safety campaigns.
34. Can I use my John Deere Buck for heavy towing all the time?
The Buck can tow and haul within its rated limits, but constant heavy towing or overloading will accelerate wear on the engine, CVT and brakes. Always check the towing and rack weight ratings in your manual and stay within them. If your work demands heavier loads than the Buck is designed for, consider using a larger utility vehicle or tractor to avoid premature failures.
35. What is the best way to keep track of my John Deere Buck maintenance?
The best approach is to keep a simple log recording dates, hour readings, and all work done, including parts fitted and part numbers. Store receipts and notes about any symptoms you observed before repair. A clear maintenance record helps you see patterns, keep up with scheduled tasks, and provide useful information to your dealer or future buyers.