
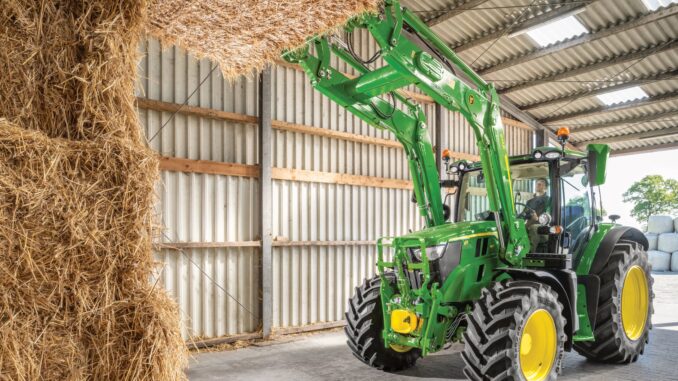
Tractor attachments turn a compact tractor into an incredibly powerful machine that can not only do ‘traditional tractor work’ but with the right attachment can become, in todays jargon, a multi-tasking monster !
Instead of buying separate pieces of equipment for each job – loader, mower, tiller, snow blade, you can swap attachments on the same single tractor, allowing you to complete a range of different jobs in an incredibly easier and simpler way.
Return on Investment (ROI) for Different Users
| User Type | Typical Benefits | Typical ROI Timeline |
|---|---|---|
| Small Farm Owner | Faster field prep, reduced labor | 1‑2 years |
| Landscaping Business | Ability to take varied jobs (mowing, debris removal) | 6‑12 months |
| Construction Contractor | Quick material handling, site cleanup | < 1 year |
| Municipal Agency | Snow removal, road maintenance, waste handling | 1‑3 years |
Understanding these benefits helps you decide which attachments will give you the quickest payback.
Tractor Attachments – Front Loaders & Buckets
What Is a Front Loader?
A front loader is a hydraulic attachment mounted on the front of a tractor, featuring two large arms (boom and dipper) that lift and move material. It works much like a giant, powered shovel.
Primary Uses
- Loading hay, feed, gravel, sand, or mulch onto trailers or wagons
- Moving pallets, bales, or heavy objects around a farmyard
- Digging shallow trenches or leveling ground
Types of Buckets
| Bucket Type | Ideal Material | Typical Use Cases |
|---|---|---|
| General‑Purpose | Loose material (soil, sand) | Everyday loading |
| Heavy‑Duty | Large rocks, demolition debris | Construction sites |
| 4‑in‑1 | Multiple shapes (flat, V‑shaped, etc.) | Versatile farms |
| Grapple | Logs, brush, irregular objects | Forestry, brush clearing |
| Rock | Large stones, boulders | Quarry work |
| High‑Capacity | Bulk loads (grain, feed) | High‑volume farms |
Choosing the right bucket prevents unnecessary wear and maximizes lifting efficiency.
Key Specifications to Consider
| Spec | Why It Matters |
|---|---|
| Lift Capacity | Determines the maximum weight you can safely raise. |
| Breakout Force | The force needed to detach the bucket from a load—important for sticky materials. |
| Lift Height | Must clear the tractor’s cab and any obstacles. |
| Hydraulic Flow (GPM) | Ensures the loader moves smoothly; undersized pumps cause sluggish operation. |
| Weight Balance | Improper balance can tip the tractor or stress the rear axle. |
Cost‑Benefit Analysis
| Factor | Benefit | Cost Consideration |
|---|---|---|
| Productivity | Reduces manual labor, speeds up loading/unloading | Higher upfront purchase price |
| Versatility | One loader can serve many tasks with interchangeable buckets | Ongoing hydraulic maintenance |
| ROI | High for material‑intensive operations (e.g., grain handling) | May need ballast or extra tires for stability |
Bottom line: For farms that regularly move bulk material, a front loader typically pays for itself within 1‑2 years.
Tractor Attachments – Mowers & Flail Toppers
Types of Tractor‑Mounted Mowers
| Mower Type | Cutting Mechanism | Best For |
|---|---|---|
| Rotary Cutters (Brush Hogs) | High‑speed rotating blades | Rough fields, tall grass, brush |
| Finish Mowers | Low‑speed, high‑lift blades | Turf, lawns, golf courses |
| Flail Mowers | Small flails on a rotating drum | Orchards, brush, safety‑critical areas |
| Drum Mowers | Heavy drum with knives | Thick vegetation, wetlands |
| Disc Mowers | Rotating discs with knives | Uniform cutting of medium‑height grass |
What Is a Flail Topper?
A flail topper (or flail mower) uses a series of small, hinged steel “flails” attached to a rotating drum. As the drum spins, each flail swings out, chopping vegetation into fine pieces.
Differences From Rotary Cutters
- Safety: Flails are less likely to throw large debris, reducing projectile risk.
- Cut Quality: Produces a finer mulch, ideal for orchard floors where you want to suppress weeds without leaving large clumps.
- Power Requirement: Generally needs slightly more PTO horsepower due to the heavier drum.
PTO Requirements & Compatibility
| Parameter | Typical Range |
|---|---|
| PTO Horsepower | 15‑30 HP for most mowers; 30‑45 HP for larger flail toppers |
| RPM | 540 RPM (standard) or 1000 RPM (high‑speed) – check the attachment label |
| 3‑Point Hitch Category | Cat 1 (20‑50 HP) for most small‑to‑medium mowers; Cat 2 (40‑100 HP) for larger units |
Cost‑Benefit Overview
| Attachment | Ideal Use | ROI Strength |
|---|---|---|
| Rotary Cutter | Rough fields, pasture renewal | High – fast clearing, low labor |
| Flail Mower | Orchards, safety‑sensitive zones | Medium‑High – better mulch, lower injury risk |
| Finish Mower | Turf, landscaping | Medium – premium finish, slower speed |
Takeaway: If you primarily need to clear brush or maintain pastures, a rotary cutter gives the fastest ROI. For orchards or areas where safety is paramount, a flail topper is worth the extra cost.
Tractor Attachments – Post‑Hole Borers
How They Work
A post‑hole borer attaches to the tractor’s PTO and drives a hollow auger into the ground, creating a clean‑cut hole for fence posts, tree seedlings, or small foundations. Some models also offer a hydraulic auger for higher torque.
Auger Sizes & Applications
| Auger Diameter | Typical Use |
|---|---|
| 4‑5 in | Fence posts, small shrubs |
| 6‑8 in | Tree planting, utility poles |
| 10‑12 in | Structural footings, large timber |
Soil Type Considerations
| Soil Type | Recommended Approach |
|---|---|
| Sandy | Faster drilling, lighter auger; watch for collapse—use casing if deep. |
| Clay | Slower; keep auger sharp and use a hydraulic version for extra torque. |
| Rocky | May need a heavy‑duty steel auger and occasional manual chip removal. |
Gearbox & Torque Requirements
- Torque: 300‑600 Nm for standard augers; up to 1,200 Nm for heavy‑duty hydraulic models.
- Gear Ratio: Lower gear (higher torque) on the tractor’s transmission is preferred during drilling.
Cost‑Benefit Snapshot
| Factor | Benefit | Cost |
|---|---|---|
| Time Saved | Drilling a 2‑ft hole manually can take 5‑10 min; a borer does it in < 1 min. | Purchase price ($800‑$2,500) |
| Labor Reduction | One operator can handle dozens of holes per hour. | Maintenance (blade sharpening, hydraulic leaks) |
| ROI | High for fence installers, orchard growers, or anyone needing many holes. | Rental vs. ownership: Rental (~$30‑$50/day) may be cheaper for occasional use. |
Tractor Attachments – Tillers & Cultivators
Rotary Tillers
- Forward Rotation: Pushes soil forward, good for breaking up compacted layers.
- Reverse Rotation: Pulls soil back, reduces drag on steep slopes.
Typical depth: 6‑12 in; ideal for seedbed preparation on small to medium farms.
Power Harrows
A power harrow uses a series of tines that oscillate to break up clods and level the surface. It’s gentler than a rotary tiller and works well for light soils and after seeding.
Field Cultivators
These are heavier, with larger tines that can reach 12‑18 in depth. Perfect for weed control between rows and for preparing beds in larger fields.
Matching HP & PTO
| Equipment | Required HP (per foot of width) | Typical PTO RPM |
|---|---|---|
| Rotary Tiller | 0.5‑0.8 HP/ft | 540 RPM |
| Power Harrow | 0.4‑0.6 HP/ft | 540 RPM |
| Field Cultivator | 0.7‑1.0 HP/ft | 540 RPM |
Rule of thumb: Add a 10‑15 % safety margin to avoid over‑loading the tractor.
Cost‑Benefit Overview
| Factor | Benefit | Cost |
|---|---|---|
| Yield Improvement | Better seed‑to‑soil contact → 5‑15 % higher yields. | Purchase ($1,200‑$4,000) |
| Fuel Consumption | More efficient than multiple passes with smaller implements. | Slightly higher fuel draw per hour. |
| Wear Parts | Tines wear out; replacement cost $150‑$400 per set. | Ongoing maintenance. |
| ROI | High for growers who plant multiple crops per year. | Break‑even in 1‑2 years for intensive farms. |
Tractor Attachments – Snow Blades & Winter Equipment
Front vs. Rear Snow Blades
| Position | Advantages | Typical Use |
|---|---|---|
| Front | Clears directly ahead; easier to see cleared path. | Small‑scale driveway or trail clearing. |
| Rear | Larger plow width; better for deep snow on roads. | Municipal streets, large property lots. |
Snow Blowers (Single‑Stage vs. Two‑Stage)
- Single‑Stage: Impeller pulls snow directly into the discharge chute. Best for light, powdery snow.
- Two‑Stage: Auger feeds snow to an impeller, allowing deeper cuts and higher discharge rates. Ideal for heavy, wet snow.
Salt Spreaders
Attach via the 3‑point hitch; includes a hopper (typically 200‑500 lb) and a spreader bar. Adjustable flow rates let you match road conditions.
Tire Chains & Ballast
- Chains: Provide traction on icy surfaces; ensure proper clearance to avoid damage.
- Ballast: Adding weight (sandbags, water tanks) improves traction and stabilizes the tractor when pushing heavy plows.
Winter Safety & Storage
- Hydraulic Fluid: Use low‑temperature rated fluid (ISO VG 46‑68).
- Cold‑Start Procedure: Prime the battery, let the engine idle a minute before engaging the PTO.
- Storage: Drain fuel if storing > 30 days; cover the attachment to prevent rust.
Cost‑Benefit Summary
| Item | ROI Driver | Best For |
|---|---|---|
| Snow Blade | Municipal contracts, winter property management | Cities, large estates |
| Snow Blower | Quick snow removal, reduced labor | Small farms, rural homes |
| Salt Spreader | Road safety, regulatory compliance | Public works, private road owners |
Winter equipment can generate seasonal revenue for contractors (e.g., $150‑$250 per hour for plowing), often covering the purchase price within a single season.
Tractor Attachments – Trailers & Transport Solutions
7.1 Agricultural Trailers
| Trailer Type | Load Capacity | Typical Use |
|---|---|---|
| Tipping Trailer | 2‑5 tons | Grain, hay, feed |
| Flatbed Trailer | 1‑3 tons | Machinery, pallets |
| Bale Trailer | Up to 10 bales | Hay bale transport |
Construction Trailers
- Dump Trailers for gravel and sand.
- Box Trailers for tools and equipment.
- Low‑boy Trailers for heavy machinery transport.
Road‑Legal Requirements
- Lighting: Tail lights, brake lights, turn signals.
- Braking: Hydraulic or electric brakes required for loads > 1,500 kg.
- Tires: Must meet DOT rating for the intended speed and load.
Load Ratings & Brake Systems
| Rating | Brake Type | Example Use |
|---|---|---|
| ≤ 1,500 kg | No brakes required (but recommended) | Light utility loads |
| 1,500‑3,000 kg | Electric brakes | Medium agricultural loads |
| > 3,000 kg | Hydraulic brakes | Heavy construction haulage |
Cost‑Benefit Comparison
| Scenario | In‑House Transport | Hired Haulage |
|---|---|---|
| Frequent daily trips | Lower per‑trip cost after initial purchase; higher maintenance. | Higher per‑trip cost, no capital outlay. |
| Seasonal spikes | May sit idle most of the year; consider renting extra capacity. | Flexibility, no storage needed. |
| Long‑distance hauling | Requires additional licensing and insurance. | Professional carriers handle permits. |
For a small farm doing regular feed deliveries, owning a tipping trailer usually pays off within 2‑3 years.
Compatibility Charts by Tractor Model & Horsepower
8.1 Understanding Tractor Categories
| Category | HP Range | Typical Use |
|---|---|---|
| Sub‑compact | 15‑25 HP | Small gardens, hobby farms |
| Compact | 25‑50 HP | Small farms, landscaping |
| Utility | 50‑100 HP | Mid‑size farms, light construction |
| Row‑crop | 100+ HP | Large commercial farming |
Point Hitch Categories
| Hitch Category | Lift Arm Width | Typical HP |
|---|---|---|
| Cat 0 | Small garden tractors | < 20 HP |
| Cat 1 | Compact tractors | 20‑50 HP |
| Cat 2 | Utility tractors | 40‑100 HP |
| Cat 3 | Large ag tractors | 80+ HP |
Sample Compatibility Matrix
| Tractor HP | Front Loader | 5‑ft Rotary Mower | 6‑ft Tiller | Post‑Hole Borer |
|---|---|---|---|---|
| 25 HP | ✓ (Cat 1) | 4‑5 ft | 4 ft | 6‑9 in |
| 40 HP | ✓ (Cat 1) | 5‑6 ft | 5‑6 ft | 6‑12 in |
| 75 HP | ✓ (Cat 2) | 7‑8 ft | 7 ft | 12 + in |
Tip: Always verify the hydraulic flow rate and PTO shaft length before purchasing an attachment.
Popular Tractor Brands & Fit Examples
| Brand | Common Models (HP) | Compatible Attachments |
|---|---|---|
| John Deere | 3100R (30 HP) | Front loaders, rotary mowers, post‑hole borers |
| Kubota | L2501 (24 HP) | Buckets, flail mowers, tillers |
| New Holland | Workmaster 40 (40 HP) | Loader, snow blade, trailers |
| Massey Ferguson | MF 260 (26 HP) | Buckets, cultivators, snow blowers |
| Case IH | Maxxum 120 (120 HP) | All heavy‑duty attachments, large trailers |
Installation Basics & Safety Precautions
Pre‑Installation Checklist
| ✅ Item | Why It Matters |
|---|---|
| PTO shaft length | The shaft must reach the attachment’s drive coupling without forcing or bending. |
| Hitch pin size & type | Correct‑size pins (cotter, clevis, or safety lock) keep the attachment firmly locked in place. |
| Hydraulic coupler compatibility | Mismatched couplers can leak pressure or cause sudden disengagement. |
| Mounting hardware inventory | Bolts, washers, and lock nuts should be the correct grade (usually Grade 8) to handle load stresses. |
| Clearance check | Verify that the attachment will not strike the cab, tires, or other accessories when operating. |
| Electrical connections (if applicable) | Lights, sensors, or electronic controls need secure, weather‑rated connectors. |
| Owner’s manual review | Each attachment comes with model‑specific torque specs and safety warnings. |
Quick tip: Keep a printed copy of this checklist in the tractor cab for every change‑over.
Safe Mounting Procedures
- Park on Level Ground – Engage the parking brake and turn off the engine.
- Lower the 3‑Point Hitch – Release hydraulic pressure so the arms are fully lowered.
- Position the Attachment – Align the hitch pins with the attachment’s mounting holes.
- Insert Pins & Lock – Slide pins fully through, then insert cotter pins or safety locks. Give each pin a firm tug to confirm it’s seated.
- Connect Hydraulic Lines – Snap couplers together, then tighten the lock nuts hand‑tight plus a quarter turn with a wrench.
- Check PTO Alignment – Rotate the PTO by hand (engine off) to ensure smooth engagement; there should be no binding.
- Run a Low‑Speed Test – Start the engine, engage the PTO at low RPM, and watch for abnormal vibrations or leaks.
Never attempt to mount an attachment while the tractor is running or the PTO is engaged.
Tractor Attachments – Operating Safety
| Hazard | Preventive Action |
|---|---|
| Load tipping | Keep the center of gravity low; never exceed the rated lift capacity. |
| Hydraulic rupture | Inspect hoses for cracks before each use; replace any damaged components. |
| Pin failure | Use pins rated for at least 1.5× the attachment’s maximum load. |
| Projectile risk (e.g., from a flail mower) | Wear eye protection and keep bystanders at a safe distance. |
| Slope operation | Limit operation on slopes steeper than 15°; use ballast or a wider rear axle for stability. |
| Noise exposure | Wear hearing protection when operating loud equipment such as rotary cutters. |
Tractor Attachments – Maintenance Schedule
| Frequency | Tasks |
|---|---|
| After each use | Clean debris, inspect pins, wipe down hydraulic couplers, check for oil leaks. |
| Weekly (if used frequently) | Grease pivot points, check tire pressure, verify bolt tightness. |
| Monthly | Change hydraulic fluid (if recommended by manufacturer), inspect hoses, test PTO clutch wear. |
| Annually (pre‑season) | Full visual inspection, replace worn pins/bolts, calibrate lift arms, perform a load test. |
| Every 2‑3 years | Replace hydraulic seals, repaint exposed metal, conduct a professional safety audit. |
Keeping a simple log (date, attachment, observations) helps catch issues early and extends the life of both tractor and attachment.
Overall Cost‑Benefit Comparison
Below is a consolidated view of the major attachment families, their typical purchase price range (USD), primary ROI driver, and the user groups that benefit most.
| Attachment Family | Avg. Cost (USD) | Primary ROI Driver | Best‑Fit Users |
|---|---|---|---|
| Front Loader + Buckets | $2,500 – $7,500 | Labor reduction, faster material handling | Farms with bulk feed/grain, contractors moving earth |
| Rotary / Flail Mowers | $1,800 – $5,200 | Rapid vegetation clearance, safety (flail) | Pasture managers, orchard owners, municipal crews |
| Post‑Hole Borer | $800 – $2,500 | Time saved on fence/planting holes | Fence installers, orchard planners, utility pole crews |
| Tillers / Cultivators | $1,200 – $4,000 | Yield boost, soil preparation efficiency | Small‑scale vegetable growers, market gardeners |
| Snow Blade / Plow | $1,000 – $4,500 | Seasonal contract income, property protection | Municipal snow services, large estates, farms in cold climates |
| Trailers (Tipping, Flatbed, Bale) | $1,500 – $6,000 | In‑house logistics, reduced haulage fees | Any operation that moves bulk goods regularly |
| Salt Spreader | $600 – $1,800 | Road safety compliance, winter service revenue | Public works, private road owners |
| Winter Snow Blower (2‑stage) | $1,200 – $3,500 | Faster deep‑snow removal, reduced labor | Rural homeowners, small farms, ski‑area operators |
Interpretation:
- High‑impact, low‑cost items (e.g., post‑hole borer) often achieve ROI within a single season.
- Higher‑cost, multi‑function tools (front loader) deliver ROI over 1‑2 years but provide ongoing versatility across many tasks.
- Seasonal equipment (snow blade, blower) can be rented during off‑season to improve overall economics.
Tractor Attachments – How to Choose the Right One
Step‑by‑Step Guide
- Define Your Primary Task
- Example: “I need to clear brush and mow pastures.” → Focus on rotary cutter and possibly a front loader for debris removal.
- Confirm Tractor Horsepower & Hitch Category
- Look at your tractor’s spec sheet. If you have a 40 HP compact tractor (Cat 1), you’re safe for most mowers, a 4‑5 ft bucket, and a 6‑inch post‑hole borer.
- Check PTO & Hydraulic Requirements
- Does the attachment need 540 RPM or 1000 RPM? Does it demand a minimum hydraulic flow (e.g., 12 GPM)? Match these to your tractor’s PTO and hydraulic pump capacity.
- Evaluate Budget vs. Expected ROI
- List the attachment cost, anticipated labor savings (hours per week), and any revenue (e.g., snow‑plow contracts). Calculate a rough payback period:
Payback (months)=Purchase Price(Hourly Savings × Hours/Month) + Revenue
- Consider Storage & Maintenance
- Do you have a shed big enough for a 6‑ft loader? Can you commit to weekly greasing and seasonal inspections?
- Review Compatibility Charts
- Use the matrix in Section 8 to verify that your tractor’s HP, hitch category, and PTO align with the desired attachment.
- Make a Pilot Test (If Possible)
- Many dealers allow a day‑trial. Test the attachment on a small plot before committing.
- Finalize Purchase or Rental Decision
- If the payback period is under 24 months and you have storage/maintenance capacity, purchase.
- If the ROI is longer or the need is seasonal, consider renting for the peak months.
Tractor Attachment Quick Reference Table
| Primary Need | Recommended Attachment(s) | Minimum Tractor Specs |
|---|---|---|
| Bulk material handling | Front loader + appropriate bucket | ≥ 25 HP, Cat 1, hydraulic flow ≥ 12 GPM |
| Pasture/field mowing | Rotary cutter (4‑5 ft) | ≥ 20 HP, PTO 540 RPM |
| Orchard brush clearing | Flail topper (3‑ft) | ≥ 30 HP, PTO 540 RPM, Cat 2 |
| Fence or tree planting | Post‑hole borer (6‑8 in) | ≥ 25 HP, PTO 540 RPM |
| Soil preparation | Rotary tiller (5‑ft) | ≥ 30 HP, PTO 540 RPM |
| Winter snow removal | Rear snow blade (8‑10 ft) or 2‑stage blower | ≥ 40 HP, hydraulic flow ≥ 15 GPM |
| Transport of loads | Tipping trailer (2‑ton) | ≥ 30 HP, rear axle rated for load, brakes if > 1,500 kg |
Tractor Attachment FAQ
General
Q1: Do I need a special license to operate a front loader?
A: In most jurisdictions, a standard tractor operator’s license suffices. However, local regulations may require a commercial vehicle endorsement if you transport loads over public roads. Check your state/provincial motor vehicle department.
Q2: Can I use a 4‑in‑1 bucket on a 25 HP tractor?
A: Yes, provided the bucket’s hydraulic flow requirement does not exceed the tractor’s pump capacity (typically 12‑14 GPM for a 25 HP unit). Verify the bucket’s spec sheet before purchase.
Q3: How often should I replace hydraulic hoses?
A: Inspect hoses every 6 months. Replace any showing cracks, bulges, or wear. For heavy‑duty work, a 12‑month replacement interval is a safe rule of thumb.
Attachments
Q4: Which mower is best for a small orchard with tight rows?
A: A flail topper (3‑ft width) provides fine mulch and reduces the risk of throwing branches. It works well on 20‑30 HP tractors with a 540 RPM PTO.
Q5: My tractor has a 1000 RPM PTO—can I still use a standard 540 RPM mower?
A: Yes. Most mowers have a PTO speed selector or a belt‑driven reducer. If not, install a speed‑change gearbox between the PTO and mower.
Q6: What is the difference between a “Cat 1” and “Cat 2” hitch?
A: Cat 1 hitches are designed for 20‑50 HP tractors and have a lower lift arm width (≈ 28‑30 in). Cat 2 hitches support 40‑100 HP machines, offering a wider lift arm (≈ 36‑38 in) and higher load capacity.
Performance & ROI
Q7: How can I calculate the ROI for a new snow blade?
A: Estimate the hourly revenue you earn from snow‑removal contracts (e.g., $150/hr). Multiply by the average number of billable hours per season. Subtract the blade’s purchase price and annual maintenance. The result divided by the purchase price gives a payback ratio. If the ratio exceeds 1 within the first season, the investment is financially sound.
Q8: Will a post‑hole borer damage my tractor’s transmission?
A: Not if you stay within the recommended PTO torque (usually 300‑600 Nm) and use the low gear while drilling. Over‑revving or using a higher gear can overload the transmission.
Safety
Q9: What personal protective equipment (PPE) is essential?
A: • Safety glasses or face shield (especially with rotary cutters or flail toppers)
• Hearing protection (≥ 85 dB noise sources)
• Steel‑toe boots (protect against dropped loads)
• Gloves (hydraulic fluid resistance)
• High‑visibility vest when working near traffic or on public roads.
Q10: How do I prevent the loader from tipping backward when lifting a heavy load?
A: • Keep the load low and close to the tractor’s centerline.
• Use ballast (sandbags or a rear weight box) to shift the center of gravity rearward.
• Engage the rear axle lock (if equipped) to increase traction.
• Never exceed the loader’s rated lift capacity.
Maintenance
Q11: My loader’s hydraulic cylinders feel “spongy.” What should I do?
A: 1️⃣ Check hydraulic fluid level and top up with the correct ISO VG grade. 2️⃣ Bleed the system to remove trapped air. 3️⃣ Inspect cylinder seals for wear; replace if leaking. If the problem persists, have a qualified technician service the hydraulic pump.
Q12: How often should I sharpen bucket teeth?
A: For heavy‑duty work (rock or gravel), sharpen every 150‑200 hours of use. For general material handling, once a year is sufficient. Always follow the bucket manufacturer’s recommended angle (typically 30°–45°).
Purchasing & Financing
Q13: Are there financing options for Lumo users who want to buy attachments?
A: Lumo Plus subscribers can access partner financing programs through select agricultural equipment dealers. Check the dealer’s website or ask a sales representative for details.
Q14: Should I buy a brand‑new attachment or a refurbished one?
A: New attachments guarantee full warranty and the latest features. Refurbished units can be cost‑effective if they come with a limited warranty and have been inspected by a reputable dealer. Compare total cost of ownership, including expected lifespan and maintenance.
Troubleshooting
Q15: My flail topper is vibrating excessively. What could be wrong?
A: Possible causes:
- Loose bolts on the drum or flail arms. Tighten to the manufacturer’s torque spec.
- Uneven wear on flails; replace any bent or cracked pieces.
- Imbalanced drum—check for missing or damaged flails on one side.
- Improper PTO speed—ensure you’re at the recommended RPM (usually 540 RPM).
Q16: The trailer brakes aren’t engaging when I apply the tractor’s brake pedal.
A: Verify that the electrical brake controller (if electric) is correctly wired and set to the appropriate gain. For hydraulic brakes, check the brake line pressure and look for air bubbles. Consult the trailer’s manual for troubleshooting steps.
Q17: Can I use a front loader on a sub‑compact (15 HP) tractor?
A: Most sub‑compact tractors are limited to Cat 0 hitches and have modest hydraulic flow (≈ 8 GPM). A small, lightweight bucket (≤ 300 lb) designed for sub‑compact units can be used, but a full‑size loader will exceed the lift capacity and may damage the hydraulic system.
Q18: What is the difference between a “quick‑attach” and a “Euro” loader mounting system?
A: Quick‑attach uses a universal pin and latch mechanism that works on many skid‑steer and compact tractors. Euro (also called pin‑on) requires a dedicated mounting plate with matching pins; it offers a more rigid connection and is common on European‑style tractors. Choose the system that matches your tractor’s factory‑installed interface.
Q19: How do I determine the correct hydraulic flow requirement for a bucket?
A: The bucket’s spec sheet lists the required flow in gallons per minute (GPM). Compare this to your tractor’s hydraulic pump rating (often printed on the pump housing). The pump’s flow must meet or exceed the bucket’s requirement; otherwise the bucket will operate slowly or stall.
Q20: My tractor’s PTO clutch slips when I engage a heavy mower. What should I check?
A: 1️⃣ Verify the PTO shaft is properly aligned and not bent. 2️⃣ Ensure the clutch spring tension is set according to the manufacturer’s adjustment procedure. 3️⃣ Check that the load does not exceed the PTO’s rated torque (usually printed on the clutch housing). If the clutch continues to slip, it may need replacement.
Q21: Is it safe to operate a front loader on a slope?
A: Operate only on slopes ≤ 15° and keep the load low and centered. Use ballast or a rear weight box to improve stability, and always engage the traction control (if equipped). Avoid sudden directional changes on inclines.
Q22: How often should I replace the bucket teeth on a rock bucket?
A: For frequent rock work, inspect teeth every 100 hours. Replace any that are worn, chipped, or cracked. Typically, a full set lasts 500‑800 hours depending on rock hardness and usage intensity.
Q23: Can I use a snow blade with a front loader?
A: Yes. Many manufacturers sell dual‑mount snow blades that attach to the loader’s frame, allowing you to switch between loading and snow removal quickly. Ensure the blade’s hydraulic lift cylinders are compatible with your tractor’s hydraulic pressure rating.
Q24: What is the advantage of a hydraulic auger over a PTO‑driven auger for post‑hole boring?
A: Hydraulic augers provide higher torque at low speeds, making them better for hard or rocky soils. They also allow variable speed control, which reduces wear on the auger bits and improves hole quality.
Q25: My flail topper is leaving large clumps of mulch instead of a fine cut. Why?
A: Possible reasons:
- Incorrect drum speed – increase PTO RPM within the manufacturer’s range.
- Worn flails – replace any that are bent or dull.
- Improper overlap – ensure flails are spaced evenly around the drum. Adjusting these factors will produce finer mulch.
Q26: How do I protect my hydraulic hoses from freezing in winter?
A: Store the tractor indoors when possible. If the hoses must remain outside, wrap them with insulated sleeves or use heated hose blankets. Drain hydraulic fluid from the hoses if the tractor will sit unused for extended periods in sub‑zero temperatures.
Q27: Can I attach a salt spreader to a front loader?
A: Some manufacturers offer loader‑mounted spreader kits that replace the bucket with a hopper and spreader bar. Verify that the hydraulic lift can handle the added weight and that the spreader’s PTO requirements match your tractor’s output.
Q28: What is the recommended ballast weight for a 30 HP tractor pulling a rear snow blade?
A: A common guideline is 10 % of the tractor’s weight as ballast. For a 30 HP tractor weighing ~2,200 lb, add roughly 220 lb of sandbags or a water tank placed over the rear axle.
Q29: My trailer’s brake lights don’t illuminate when I press the tractor’s brake pedal. What could be wrong?
A: Check the electrical wiring harness between the tractor and trailer for loose connections or corrosion. Also verify that the brake light switch on the tractor is functioning (you can test with a multimeter). Replace any damaged wires or switches.
Q30: Is it necessary to grease the loader’s pivot points after every use?
A: While daily greasing isn’t required for light use, it’s best practice to inspect and grease the pivot points weekly during heavy operation seasons (e.g., during active loading or snow removal). This prevents premature wear and maintains smooth articulation.
Q31: How can I reduce fuel consumption when using a front loader?
A: • Keep the load low and close to the tractor’s centerline.
• Use the lowest effective PTO speed.
• Perform regular hydraulic maintenance (clean filters, replace fluid).
• Avoid idling with the loader raised; lower it when not actively lifting.
Q32: What safety feature should I look for on a tractor‑mounted snow blower?
A: Look for an automatic shut‑off that stops the PTO if the impeller stalls, and a deflector guard that redirects debris away from the operator. Both features reduce the risk of injury and equipment damage.
Q33: Can a compact tractor pull a bale trailer without a hitch upgrade?
A: Most compact tractors (25‑50 HP) come with a Category 1 hitch rated for up to 2,000 lb on a single‑axle trailer. If the bale trailer’s gross weight exceeds this rating, you’ll need a reinforced hitch or a higher‑capacity tractor.
Q34: How do I know if my hydraulic pump is oversized for my attachments?
A: An oversized pump can cause excessive heat and inefficient fuel use. If you notice the pump running hot at low flow rates, or the hydraulic pressure gauge consistently reads above the attachment’s maximum rating, the pump may be too large for your typical workload. Consider installing a pump with a lower displacement or using a flow control valve to limit output.
Q35: What is the best way to store a post‑hole borer during the off‑season?
A: Clean the auger bit of soil and debris, apply a thin coat of light machine oil to prevent rust, and store it dry in a sealed container or hanging rack away from moisture. Keep the PTO shaft covered to avoid dust ingress.